Automating Web Page Screenshots
Screenshot Tools
I’ll briefly go over the following tools: CutyCapt, wkhtmltoimage, Firefox, PhantomJS, and Pageres-CLI, with a bit more focus on the last two.
Some of these tools allow you to specify the user agent, which can give you some control over how the page will be rendered. You can get a very long list of various user agent strings here.
CutyCapt
 Download it here. Installation is fairly straight-forward. You do need X11 server running on your machine to use CutyCapt. Alternatively, you would need to run it via
 xvfb-run, which is not difficult either.
An issue you may notice with CutyCapt is missing some dynamic content that would only be visible if you scrolled down the page. This utility has quite a few features, but scrolling ain’t one of them.
url="https://igoroseledko.com/the-future-of-spaghetti-code/"
ua="Mozilla/5.0 (Windows NT 10.0; Win64; x64) AppleWebKit/537.36 (KHTML, like Gecko) Chrome/60.0.3112.113 Safari/537.36"

cutycapt --url="${url}" --user-agent="${ua}" --max-wait=10000 --out-format=png --method=get --javascript=on --java=on --plugins=on --private-browsing=off --auto-load-images=on --js-can-open-windows=off --js-can-access-clipboard=off --zoom-factor=1 --delay=0 --print-backgrounds=on --min-width=1280 --min-height=1280 --out=screenshot_cutycapt.png 2>/dev/null
wkhtmltoimage
 This tool is part of
 wkhtmltopdfpackage. It is quick and has a good selection of options. You can install it with sudo apt install wkhtmltopdf on Debian, or get a precompiled package here.
There are some issues getting certain page elements. You will notice some missing graphics in the sidebar and the footer. This is dynamic content that is loaded when you scroll down, which you can’t do in this case.
url="https://igoroseledko.com/the-future-of-spaghetti-code/"
ua="Mozilla/5.0 (Windows NT 10.0; Win64; x64) AppleWebKit/537.36 (KHTML, like Gecko) Chrome/60.0.3112.113 Safari/537.36"

wkhtmltoimage --custom-header-propagation --custom-header User-Agent "${ua}" --images --cache-dir /tmp --enable-javascript --no-stop-slow-scripts --javascript-delay 20000 --format jpg --quality 95 --load-error-handling ignore "${url}" screenshot_wkhtmltoimage.jpg 2>/dev/null
Firefox
 With Firefox
 screenshot CLI option you don’t really get any options except the --window-size parameter. It is significantly slower than other tools discussed here and it only supports PNG format. With my Firefox 61.0, screenshots are missing all graphics – not sure why.
An interesting option here is that Firefox is supposed to make use of any configured plugins when running in headless mode to take screenshots. It would’ve been more interesting if it actually worked. So why am I including Firefox here? Because I like Firefox and I am hoping its headless functionality will improve.
url="https://igoroseledko.com/the-future-of-spaghetti-code/"

firefox -screenshot screenshot_firefox.png "${url}" 2>/dev/null
Pageres-CLI
 This utility uses PhantomJS on the back-end to create the actual screenshots. The plus here is you don’t have to write scripts to access many of the advanced functions of PhantomJS.
Many but not all, obviously. There’s this same limitation of rendering dynamic content down toward the bottom of the page. There may be an option for this, but I could not find it.
url="https://igoroseledko.com/the-future-of-spaghetti-code/"
ua="Mozilla/5.0 (Windows NT 10.0; Win64; x64) AppleWebKit/537.36 (KHTML, like Gecko) Chrome/60.0.3112.113 Safari/537.36"

pageres --useragent="${ua}" --delay=5 "${url}" --filename="<%= date %> - <%= url %>-${RANDOM}
PhantomJS
 This is a scripted headless browser that can actually interact with Web pages and not just take screenshots. Currently, PhantomJS is the tool of choice for browser-based tests for continuous integration, as well as writing all sorts of Web bots.
Because of its extended functionality PhantomJS is a bit more difficult to use. First you need to create the JS file, which is a script telling PhantomJS how to handle loading and rendering the Web page. For the example below I am using this ~/phantomjs_rasterize.js:
var page = require('webpage').create(),
    system = require('system'),
    address, output, size;
page.settings.resourceTimeout = 10000;
var userAgent = system.args[1];
page.settings.userAgent = userAgent;

if (system.args.length < 3 || system.args.length > 5) {
    console.log('Usage: rasterize.js URL filename [paperwidth*paperheight|paperformat] [zoom]');
    console.log('  paper (pdf output) examples: "5in*7.5in", "10cm*20cm", "A4", "Letter"');
    phantom.exit(1);
} else {
    address = system.args[2];
    output = system.args[3];
    page.viewportSize = {
        width: 1440,
        height: 1280
    };
    if (system.args.length > 3 && system.args[3].substr(-4) === ".pdf") {
        size = system.args[4].split('*');
        page.paperSize = size.length === 2 ? {
                width: size[0],
                height: size[1],
                margin: '0px'
            } :
            {
                format: system.args[4],
                orientation: 'portrait',
                margin: '1cm'
            };
    }
    if (system.args.length > 4) {
        page.zoomFactor = system.args[5];
    }
    page.open(address, function(status) {
        if (status !== 'success') {
            console.log('Unable to load the address!');
            phantom.exit();
        } else {
            page.evaluate(function() {
                //$("#overlay, #modal").remove();
                var current = 0,
                    delta = 1280,
                    total = document.height - delta;
                var style = document.createElement('style'),
                    text = document.createTextNode('body { background-color: #ffffff; }');
                style.setAttribute('type', 'text/css');
                style.appendChild(text);
                document.head.insertBefore(style, document.head.firstChild);
                window.scrollTo(0, current);

                function fakeScroll() {
                    if (current < total) {
                        current = current + delta;
                        window.scrollTo(0, current);

                        window.setTimeout(fakeScroll, 200);
                    } else {
                        window.scrollTo(0, 0);
                    }
                }

                fakeScroll()
            });
            window.setTimeout(function() {
                page.render(output);
                phantom.exit();
            }, 10000);
        }
    });
}
To make things easier, PhantomJS comes with a bunch of handy examples of JS scripts that you can quickly adapt to your needs. There’re also plenty of resources, such as GitHub, where you can find just about anything you need.
Unlike previous tools, PhantomJS is able to successfully simulate scrolling and load dynamic content all the way to the bottom of the page (although it did take me a bit of googling and trial-and-error before I got this to work). So, some assembly required, but, overall, this is the best solution for the most accurate screenshots.
url="https://igoroseledko.com/the-future-of-spaghetti-code/"
ua="Mozilla/5.0 (Windows NT 10.0; Win64; x64) AppleWebKit/537.36 (KHTML, like Gecko) Chrome/60.0.3112.113 Safari/537.36"

phantomjs --load-images=true --local-storage-path=/tmp --disk-cache=true --disk-cache-path=/tmp --cookies-file=/tmp/phantomjs_cookies.txt --ignore-ssl-errors=true --ssl-protocol=any --web-security=true ~/phantomjs_rasterize.js "${ua}" "${url}" screenshot_phantomjs.png 2>/dev/null
Preserving for Posterity
Let’s say you have a list of URLs that you want to screenshot periodically. The following script will loop through your list of links; make screenshots using PhantomJS; add an EXIF comment field; and insert a hidden watermark message using steghide. The latter is not fool-proof, but can be useful if you need to check if the images have been tampered with.
cat "${url_list}" | while read url; do
urldir="${basedir}$(url_nopro=${url:7}; url_rel=${url_nopro#*/}; echo "/${url_rel%%\?*}")"
mkdir -p "${urldir}"
screenshot_out="${urldir}$(date +'%Y-%m-%d_%H%M%S').jpg"

function phantom_do() {
  phantomjs --load-images=true --local-storage-path=/tmp --disk-cache=true \
  --disk-cache-path=/tmp --cookies-file=/tmp/phantomjs_cookies.txt \
  --ignore-ssl-errors=true --ssl-protocol=any --web-security=true \
  ~/phantomjs_rasterize.js "${ua}" "${url}" "${screenshot_out}" 2>/dev/null
}

function convert_do() {
  f="$(mktemp)"
  echo "Screenshot of ${url} taken on $(date +'%Y-%m-%d %H:%M:%S')" > "${f}"
  convert -comment "$(cat "${f}")" "${screenshot_out}" "${screenshot_out}" 2>/dev/null
}

function steghide_do() {
  steghide embed -cf "${screenshot_out}" -ef "${f}" -p "${pass}" -q -f
  /bin/rm -f "${f}"
}

function runtime_do() {
 phantom_do
 convert_do
 steghide_do
}

echo ${url}
runtime_do &

done
And, if you need to extract the watermark message, use this command:
steghide extract -sf "${screenshot_out}" -xf "${screenshot_out}.txt" -p "${pass}" -f -q
Comparing Screenshots
The ability to compare two or more screenshots may come in handy at some point. Probably the best tool for this is ImageMagick. In the example below I took two screenshots of the same URL some time apart. Running the following command produced a diff image:
compare -metric rmse -subimage-search screenshot_phantomjs_2.png screenshot_phantomjs_1.png -compose src screenshot_phantomjs_diff.png
Here are the two screenshots and the resulting diff image, showing what changed:


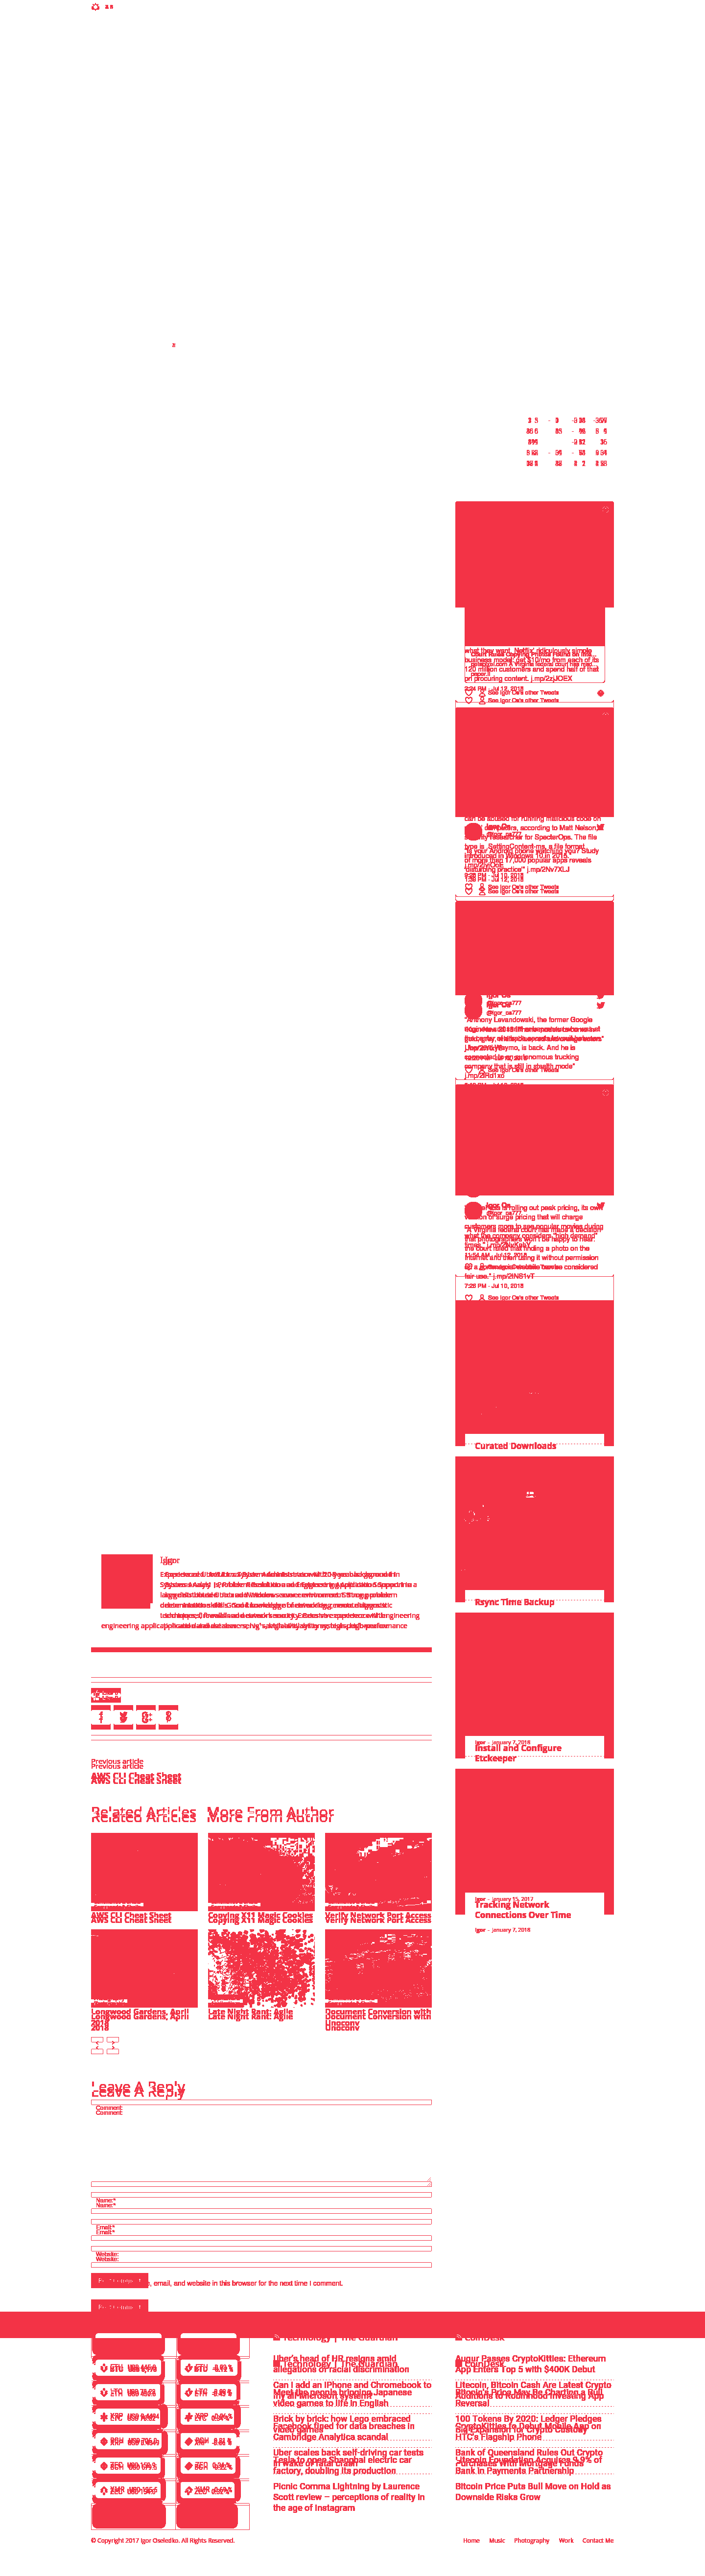
As you can see, the highlighted changes are due to various dynamic content, such as my Twitter feed, for example. It is possible to configure the compare utility to look for difference only in a particular area of the image. In this case, I would like it to see if there were any changes in the main body of the post, while ignoring changes in dynamic content.

![8vl3onvznkopxa6ny9995yrc4gw[1]](https://i0.wp.com/www.krazyworks.com/wp-content/uploads/2021/10/8vl3onvznkopxa6ny9995yrc4gw1-80x80.jpg "Awk & sed Snippets for SysAdmins")
![rhd3hj6zvnqeth7qo8em0alduj0[1]](https://i2.wp.com/www.krazyworks.com/wp-content/uploads/2021/10/rhd3hj6zvnqeth7qo8em0alduj01-80x80.jpg "Synology NAS Hacks")
![ytioq398kc1wnvvz95uixhcn5ii[1]](https://i2.wp.com/www.krazyworks.com/wp-content/uploads/2021/08/ytioq398kc1wnvvz95uixhcn5ii1-80x80.jpg "WordPress: Post-processing of the image failed")
![9dwz62kvm0gtjya9kwb7pawtk9y[1]](https://i2.wp.com/www.krazyworks.com/wp-content/uploads/2021/10/9dwz62kvm0gtjya9kwb7pawtk9y1-80x80.jpg "Finding Duplicate Photos")
![tq9mhhd5xy2q0kto2j1785n6odv[1]](https://i1.wp.com/www.krazyworks.com/wp-content/uploads/2021/10/tq9mhhd5xy2q0kto2j1785n6odv1-80x80.jpg "NFS I/O Stats with Logging")
![iwoau71okwxqh4jv3k4ook32qps[1]](https://i2.wp.com/www.krazyworks.com/wp-content/uploads/2021/08/iwoau71okwxqh4jv3k4ook32qps1-80x80.jpg "Finding Cron Jobs")
![4ucne6vs8m7hqdl0el9ddqd1sql[1]](https://i2.wp.com/www.krazyworks.com/wp-content/uploads/2021/10/4ucne6vs8m7hqdl0el9ddqd1sql1-80x80.jpg "Inventorying NFS Mounts and Mount Options")
